Einkorn: Success and Failure

I’ve been slowly replacing my family’s wheat products with Einkorn wheat-mostly. Some wheat strains are pretty old and haven’t changed too much. One is durum wheat used to make semolina pasta. The ancient grain from which durum is derived is khorasan wheat, trademarked and sold as Kamut. To make really good pasta, durum/semolina/khorasan wheat is a MUST. So I’ve decided to use mostly einkorn, and a little  Kamut wheat. I’ve done this slowly so that the replacement has been fairly painless.

It is tempting to walk down the gluten free aisle and/or the specialty bread aisle and pick breads that use ancient grains, or use grains other that wheat. However, this is a trap. I can’t say definitively that all store-bought stuff have things in it that are not so good for you. I mean, half the time I can’t even pronounce some of the chemicals used. Part of eating better is making the food myself so I can control what is put in the recipes. To that end, I’m buying a bread maker at some point so I can make my own bread loaves. Because the thing I’ve noticed when I eat only einkorn wheat is that I don’t have the continued salty/oily food craving that so often comes when I eat bread of any kind. I can’t wait to see what happens when my house is one hundred percent modern wheat/grain free.

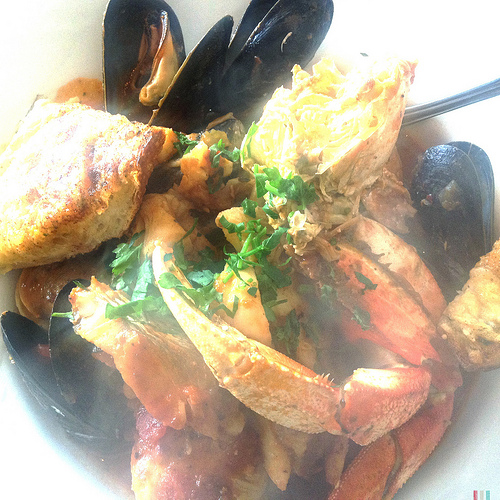
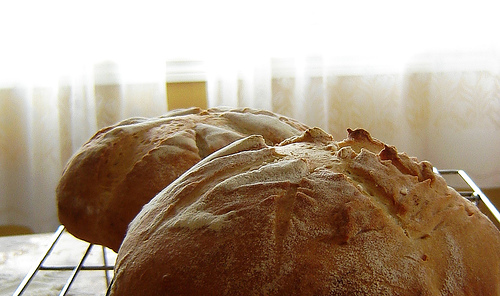
That was my success. My failure is recipe related. Seriously, I am not an awesome baker. Not like I can cook. So it should come as no surprise that my Cioppino came out FAB, but my bread loaf was a bust. Don’t get me wrong, it was edible. Just not great. And bread should be great. That’s part of the draw. I didn’t like how hard the crust became. So I am thinking a bread machine might help with this issue. Especially if I get one that has different crust settings. At least, that’s what I’m telling myself.

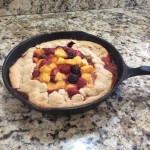
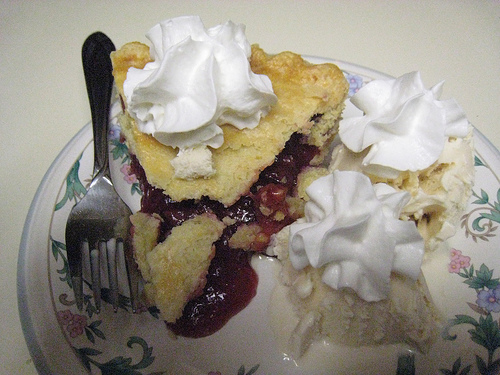
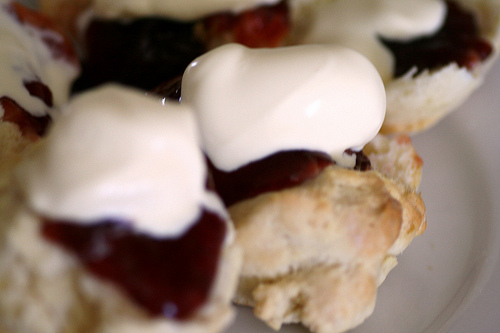
Not to disappoint, let me leave you with this success. Summer fruit crostata. Crostatas are rustic fruit tarts. Free form, if you will. And they are delicious. And did I mention that I am not the best baker? Well, crostatas are extremely forgiving. EXTREMELY. 😉 You can use almost any fruit you have. I like berries and peaches, or strawberry and rhubarb, or you can come up with your favorite fruit combo. The picture for today’s recipe is my peach and mixed berry crostata made from einkorn wheat. It was delicious.

Fruit Crostata

2014-09-02 14.29.54Ingredients
1 1/4 cup(s) (plus 1 tablespoon) all-purpose einkorn flour
1/4 cup(s) (plus 2 tablespoons) sugar
1/8 teaspoon(s) salt
1/2 cup(s) (1 stick) unsalted butter, softened
2 large eggs, lightly beaten
1 cup(s) raspberries
1 cup(s) fresh blackberries (<— or a combo of fruits to make 2 cups)
1 tablespoon(s) fresh lemon juice
1 tablespoon(s) turbinado sugar

Directions
1. Make the dough: Combine 1 1/4 cups flour, 1/4 cup sugar, and salt in a large bowl. Form a well in center of the dry ingredients and place the butter and 1 egg in the well. Using your hands, mix the ingredients into a soft, pliable dough. Form it into a 4-inch disk and place it on lightly floured parchment paper. Lightly dust the dough with flour and roll it into a 10-inch circle. Place dough with parchment on a baking sheet, cover the dough with plastic wrap, and chill for 10 minutes. (I like to chill my dough for at least 30 minutes, preferably up to an hour or more- it has to do with the butter getting real cold. So you can follow the recipe or follow my suggestion. I know which one I would do. lol). Preheat oven to 375°F.

2. Make the crostata: In a small bowl, mix remaining flour and sugar and set aside. Remove the dough from the refrigerator and evenly spread the flour and sugar mixture on the dough, leaving a 1-inch-wide border around the edge. Place berries on top of the mixture and sprinkle with lemon juice. Fold the 1-inch border over top of the berries to form a 9-inch crostata.

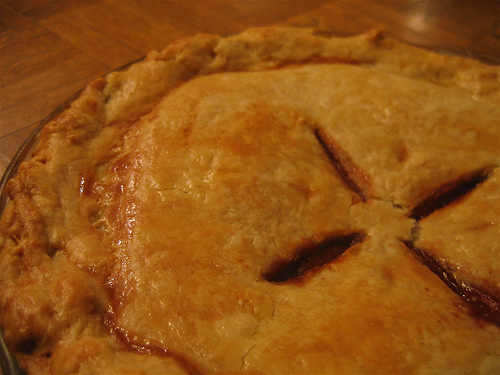
3. Bake the crostata: Lightly brush the top of the crostata dough with remaining beaten egg and sprinkle with turbinado sugar, if desired. Bake on the middle rack of the oven — about 35 minutes, or until the top turns lightly golden brown. It normally takes about 40-45 minutes for me to get the desired color on the crust. Remove from the oven and slide crostata with the parchment paper onto a wire rack. Or if you’ve used a cast iron skillet like me to bake your crostata, just leave it in the skillet to cool. Cool for 1 hour. Serve warm or at room temperature.

Tip: Make real whipped cream. Serve the warm crostata with the best vanilla ice cream you can buy and a dollop of fresh cream. You will think you’ve died and gone to heaven. I don’t have a huge sweet tooth. I maybe indulge in desserts a few times a year. Crostatas are always something I can’t resist when I make it. It’s just that good.

Einkorn Experiment

Or E2, however one gets the squared symbol to show up after the the E, or the double E. Call it what you’d like. Whatever this rose is named, I’m gonna be taking a little foray into cutting out modern wheat and replacing it with Einkorn. All this should be vastly interring as I try to make homemade bread and pasta and tortillas from Einkorn flour. Primitive flour has some different properties, namely sticky ones, and should turn my kitchen into a hot mess. Just the way I like it.

I have some health issues that need to be addressed. One of the ways in which I am doing so is taking a few supplements. Another way is changing the way I eat. I’ve decided to switch from mostly meats to fish and seafood. And to cut all modern wheat from my diet, instead using Einkorn for all my flour-y needs. I’m hoping these changes have a positive impact on my health and my life.

As part of the diet, my next few recipe shares will showcase some of my eating choices. Tomorrow, I’m getting a huge box of Alaskan seafood from New Sagaya in Anchorage. King crab legs, salmon, halibut, reindeer sausage all in one jumbo box of goodness. I’ll probably just eat the king crab legs steamed with butter and lemon. The salmon will be barbecued in herbs and sauce. But the rest, well, some of it will be chunked to put into a cioppino. To sop it all up, I’ll be making a homemade, rustic Einkorn bread.

Cioppino

3 tablespoons olive oil
1 large fennel bulb, thinly sliced
1 onion, chopped
3 large shallots, chopped
2 teaspoons salt
4 large garlic cloves, finely chopped
3/4 teaspoon dried crushed red pepper flakes, plus more to taste
1/4 cup tomato paste
1 (28-ounce) can diced tomatoes in juice
1 1/2 cups dry white wine
5 cups fish/seafood stock
1 bay leaf
2 corn cobs, cut in small pieces
1/2 pound sausage, half-mooned (I use reindeer)
1 pound manila clams, scrubbed
1 pound mussels, scrubbed, debearded
1 pound uncooked large shrimp, peeled and deveined
4-6 large scallops
Some crab, either pieces of king crab or smaller crabs halved
1 1/2 pounds assorted halibut and/or salmon filets, cut into 2-inch chunks

Directions

Heat the oil in a very large pot over medium heat. Add the fennel, onion, shallots, and salt and saute until the onion is translucent, about 10 minutes. Add the garlic and 3/4 teaspoon of red pepper flakes, and saute 2 minutes. Stir in the tomato paste. Add tomatoes with their juices, wine, fish stock and bay leaf. Cover and bring to a simmer. Add corn and sausage. Reduce the heat to medium-low. Cover and simmer until the flavors blend, about 30 minutes.

Add the clams and mussels to the cooking liquid. Cover and cook until the clams and mussels begin to open, about 5 minutes. Add the shrimp, crab, scallops and fish. Simmer gently until the fish and shrimp are just cooked through, and the clams are completely open, stirring gently, about 5 minutes longer (discard any clams and mussels that do not open). Season the soup, to taste, with more salt and red pepper flakes.

Ladle the soup into bowls and serve.

Slow Rise Rustic Einkorn Bread

5 cups (600g) of jovial einkorn flour
3 cups (600g) of jovial wheat berries
1¾ cup (410g) of warm water
¼ tsp. (1g) dry active yeast
1 tsp. (6g) sea salt

Directions

Mix flour, salt and yeast together in a large mixing bowl.

Add water and combine with your hands until all ingredients are mixed well. Your hands will be a sticky mess at this point, but that is normal with einkorn.

With a spatula, push down the sides of the dough and flatten the top.

Cover the bowl with plastic wrap and let rise in a dark place for 12-14 hours. Here is what the doughs should look like when ready to bake. Depending on the weather, the time it takes to proof the dough may vary.

Remember, einkorn flour contains carotenoids that can oxidize if exposed to water and light for a long period of time. Just like a carrot peel can darken, einkorn dough will when exposed to light. Therefore, either store the bowl in a dark space or use a ceramic bowl and put a plate on top to protect the dough from light.

When the dough is ready, place a ceramic or cast iron pot that is oven-safe and has a lid in the oven and heat for 30 minutes to the maximum temperature setting, or at least 500°F then lower the temperature to 450°F.

Turn out the dough on a heavily floured work surface. Pat the dough flat, and using a dough scraper or your hands, fold each of the four sides toward the center, using added flour to make a rounded shape. This is not like forming a typical loaf since the dough is quite soft. Don’t worry yourself too much about the shape because the dough will have a quick rise in the oven and will correct itself, leaving you with a beautifully rustic bread.

The rounded dough can be proofed for one more hour before baking, but we found in our testing it did not make a difference in the finished loaf. Therefore, we turned the dough right into the pot and baked covered for 40 minutes. We also baked the loaf for 30 minutes covered and 10 uncovered, but in the end, found the best results at 40 minutes with a cover for the entire baking time.

If you like a dark crust, return the loaf to the oven for 5-10 minutes more uncovered.

Lift the loaf out of the dish and place on a cooling rack.

You may also try this cooking method on a firmer dough.

Let cool for at least one hour before slicing.

A Tale of Two Pies

It’s summer. So it’s hot. And it might not seem like the time to bake, getting your kitchen all steamy and what not. But with all the delicious fruit available at farmer’s markets and grocery stores, well, pies are really the answer to a mid-summer dilemma.

Pies have always had an old-fashioned connotation. A cook’s staple. There’s a reason they’ve been around so long. They’re fucking yummy. Add ice cream and viola… sweet warm fruit pares with frozen cream to make something fab, y’all.

One of my fondest memories is of my Aunt Jessie’s rhubarb pie. The tartness combined with fresh from the cow that morning cream adding just that right touch of sweetness t make the tart stand out. I’ve tried to recreate that pie. To no avail. They either come out too sweet or not sweet enough. So I moved on and discovered strawberries in my rhubarb go together just fine. Those pies never seem to come out too sweet or not sweet enough. They one out just right.

The tale of the second pie stems from how great the strawberry rhubarb version came out. I liked the tartness of one thing melding together with the sweetness of another. So I looked. And looked. High and low, I looked. Nothing seemed to catch my fancy. Until I stumbled onto a recipe for peach raspberry pie. Holy Smokes, Batman. That combo sounded fab-u-lous. Raspberry with their tart and tangy taste. And peaches. Oh my goodness. I used to live in Georgia. Back in the day. Way back, yo. If you’ve EVER lived in or near Georgia in the summer, peaches became your best friend. I love them. Off the vine, cut up, in Bellinis, in cobblers and in pies. So I made magic in the kitchen.

So ends my tale of two pies.

Strawberry Rhubarb Pie

1¼ cups plus 2 tsp. sugar

By: Brandy

⅓ cup all-purpose flour
¼ tsp. ground nutmeg
¼ tsp. ground cinnamon
2 cups thinly sliced rhubarb
3 cups halved and hulled strawberries
2 tbsp. butter, cut into small pieces
2 tsp. milk

INSTRUCTIONS:
1. Preheat oven to 400°.  Mix together 1¼ cups of the sugar, flour, nutmeg, and cinnamon in a large mixing bowl, then add rhubarb and strawberries, tossing well to coat evenly.

2. Fill bottom crust with rhubarb–strawberry mixture and scatter butter on top. Cover with remaining pastry round (discarding wax paper) and crimp edges together to seal. Score top to allow steam to escape, brush with milk, and sprinkle with remaining 2 tsp. sugar. Place pie on a baking sheet and bake until crust is golden and filling is bubbling, about 50 minutes. If edge of crust browns too quickly, cover edge with a strip of aluminum foil to prevent burning. Allow pie to cool for 1 hour before serving.


Peach Raspberry Pie

⅔ cup sugar, plus more for sprinkling

By: Laura

⅓ cup flour
¼ cup packed light brown sugar
2 tbsp. fresh lemon juice
1 tbsp. peach schnapps
2 tsp. vanilla extract
1 tsp. cinnamon
½ tsp. ground ginger
½ tsp. kosher salt
¼ tsp. freshly grated nutmeg
6 large peaches (about 1 ¾ lb.), peeled and cut into ½″-thick slices
1 cup mashed fresh raspberries
4 tbsp. unsalted butter, cubed

INSTRUCTIONS
1. Preheat oven to 425°. In a large bowl, toss together sugar, flour, brown sugar, juice, schnapps, vanilla, cinnamon, ginger, salt, nutmeg, and peaches; set aside.

2. Roll one dough disk into a 12″ circle; fit into a 9″ pie plate. Pour half the filling into pie shell and cover with raspberries. Pour in remaining peach filling, and then dot filling with butter. Roll the remaining dough disk into a 12″ circle, place over filling, and trim dough, leaving a ½″ overhang. Lift edges and fold under to form a thick rim around the pie. Cut 4 slits in top of pie crust, brush with milk or melted butter, and sprinkle with more sugar. Bake until golden brown and filling is bubbling in the center, about 45 minutes. Let cool for about 20 minutes before serving.

Chicken Madeira

Coming off Memorial Day weekend, the last thing–the VERY LAST THING–I need is more calorie laden food. Umm, not. But a small part of me was craving, y’all. I got to cravin’ Cheesecake Factory’s Chicken Madeira. So I set about to getting the recipe. And there are lots of them, both for Cheesecake Factory’s version as well as for the sauce itself. Here is my not so off-the-cuff rendition of this fav.

Chicken Madeira

Ingredients:

4-6 pieces of chicken, pounded thin (I use a mix of breasts and thighs)
3 pieces of garlic, minced
1-2 medium onions, diced
2-3 cups of mushrooms, sliced
2-3 tbsps butter
3 cups madeira wine
1 cup beef broth ( I use a cup of water and Knorr’s beef jelly thing-a-ma-bobs)
2-3 tbsp flour
mozzarella slices
1 tsp thyme
salt
pepper

Instructions:

1. Preheat oven to 350. Heat skillet over medium-high heat. Season chicken with salt and pepper. Fry each piece in oil until golden brown on both sides. Place in oven casserole dish as they finish cooking.

2. Add more oil to the skillet. Add onions and cook for a few minutes. Add garlic and cook for another minute or two. Add mushrooms and cook for a few minutes.  Add flour and cook until it pastes. Add thyme and salt and pepper. Cook for a minute. Add wine and broth and cook until thick and reduced in half.

3. Place mozzarella slices on each piece of chicken. When sauce if thick and reduced in half, pour over chicken. Bake until cheese bubbles, or longer.

The Cheesecake Factory serves their chicken with asparagus and a heaping mound of mashed potatoes. I can attest that this is an excellent accompaniment choice for this dish. However, I like mine over an argula salad instead of asparagus, although I do really, really like the mashed potatoes to sop up the delicious madeira gravy. For those of you doing the low carb thing, roasted vegetables would be cool instead of the mashed potatoes as would roasted and riced cauliflower. For the Argula salad, I make a lemon/white wine vinaigrette right before I toss the greens and serve it under the chicken to help the argula wilt slightly.

Vinaigrette

1 tbsp dijon mustard
2-3 tbsp lemon juice
1-2 tbsp white wine vinegar
1/2 cup olive oil salt pepper parmesan cheese
– put mustard, juice and wine in a bowl. Whisk together. Keep whisking while adding olive oil. Add salt and pepper to taste being sure to under season for salt since the parmesan cheese is salty.  Stir in parmesan cheese. Toss in argula.

I fell in love with “rocket” as argula is called on the continent many moons ago. It is served quite often in many European countries. Plus, it just taste like summer. In any event, slice up some limes and pop open a Corona and eat the chicken. It is delish. Add in some rocket, and this flavor combo is out of this world. 😉

Risi e Bisi

Peas and Rice. Simple. Perfect. I learned about this dish when I went to Venice one summer. It was the summer that I got a wild hair up my ass and decided to leave everything behind for a month and kick around Europe. Granted, I should’ve done this as a young woman and not the… ahem… older woman I was when I went. I had a blast anyway.

It was the first vacation I’d ever taken alone. It was also the longest vacation I’d ever taken. And I included a 9 day hut-to-hut hiking trip through the Swiss Alps. I spent the next twenty days tooling around the Italian countryside by train. I got comfortable in my own skin on that trip. Alone. By myself in a foreign country or two. I met up with some girlfriends in Rome, but other than that… it was all me all the time.

I scheduled a couple of things before I left on my trip. One of those was a cooking class in Venice. And in that cooking class, I learned to make risi e bisi old school from a gracious native hostess. I’ve never forgotten her or the dish.

The recipe uses a combination of broth and wine. Many use just broth. The ones who view risi e bisi as the food to prepare as a herald of spring will find fresh peas and use the water from the cooking peas as the broth to make risi e bisi. I am not so exuberant in my greeting of Spring. 😉

Risi e Bisi

14-ounce bag frozen peas (a full pound is fine, too)
4 tablespoons butter
2 tablespoons onion, chopped
4 cups chicken stock, or 2 cups stock/2 cups white wine, or 4 cups pea broth
1 cup Arborio rice
1/2 cup Parmesan, freshly grated

In a soup pot or dutch oven, melt the butter over medium heat. Add the onion and sauté until it becomes lightly golden. In a separate pot, heat the stock until it reaches a simmer.

Easy Method:

Once the onion is ready, add 3 cups of the simmering stock, the rice, the bag of frozen peas, and a good pinch of salt. Cover the pot and and cook at a low boil for about 20 minutes, stirring occasionally, until the rice is just tender. If the soup is too thick, thin it slightly with the remaining stock; it should be thick but not porridge. When the rice is ready, add the grated Parmesan and taste for salt. Serve.

More Difficult Method:

Once onions are translucent, add rice to pot. Cook for a few minutes until rice starts absorbing the oil. Add in half a cup of liquid and cook while stirring. Cook down until almost all liquid is absorbed, add another half up of liquid. Cook while stirring until most of the liquid has been absorbed. Continue until all liquid has been cooked. In the last half cup of liquid, add peas. Taste and adjust seasoning. Don’t over salt if adding grated Parm as the cheese will add salt naturally.

* you can add diced pancetta or bacon to the pot with the onions to give it a different flavor or you can add crispy bacon bits at the end along with crunchy fried onions as a garnish. But this is a simple dish created to showcase new Spring peas.


Scones, Scones and more Scones

Keeping with the Irish theme, I thought I’d share a few scone recipes. The first one is an interpretation of an Irish scone. The second recipe is the one I use most. Last, but not least, is a paleo almond flour variation. Try one or try them all. I like ’em all enough NOT to make them too often. Ummm, cause they go straight to my ass. 😉


“Real” Irish Scones

By: Emily

~makes about 8-10 small scones

2 cups unbleached all-purpose flour
1 tablespoon baking powder
2 teaspoons granulated sugar
1 teaspoon fine salt
3 tablespoons unsalted butter, softened to room temperature
1/2 – 3/4 cup milk, cream, or a combination

Preheat oven to 350° F. Place a baking sheet pan lined with parchment paper or a Silpat in the oven.

Sift together the flour, baking powder, sugar and salt into a mixing bowl. Use your fingertips to work the butter into the dry ingredients until the mixture just holds together.

Working the mixture as little as possible, add 1/2 cup milk and mix until it forms into a soft, slightly sticky ball. Add more milk if needed to reach desired consistency.

Place the dough on a very lightly floured work surface. Using a floured rolling pin, gently roll the dough to a 1-inch thick slab. Dip a 1-2-inch biscuit cutter in flour and cut out the individual scones, or slice the dough with a knife of the blade of a bench scraper.

Remove baking tray from the oven and arrange the scones on it. Bake 8 minutes, turn over, and bake another 4 minutes or until just barely brown.

Serve with butter, preserves, and freshly whipped cream.

If you have leftovers, reheat at 350°F for 2-3 minutes or until warmed through, or freeze by wrapping completely cooled scones in plastic wrap, then placing in a zippered bag or freezer-safe storage container. To reheat, thaw at room temperature in the plastic wrap, then unwrap and re-heat as above at 350° F.

Variations

• Herb – add a few tablespoons chopped fresh thyme, rosemary, chives or sage to the dry mixture.
• Cheese – add 1/2 cup grated cheddar or Parmesan cheese to the dry mixture. Brush the tops with beaten egg or cream and sprinkle with more grated cheese.
• Currant – add 1/2 cup currants (or raisins) to the dry mixture.
• Chocolate – increase the sugar to 2 tablespoons, add 4 ounces chopped semi-sweet or bittersweet chocolate, and sprinkle each with a pinch raw sugar before baking.


Dreamy Cream Scones

2 cups (10 ounces) unbleached all-purpose flour, preferably a low-protein brand such as Gold Medal or Pillsbury
1 tablespoon baking powder
3 tablespoons sugar
1/2 teaspoon salt
5 tablespoons chilled, unsalted butter, cut into 1/4-inch cubes
1/2 cup currants (I used dried cranberries, and chopped them into smaller bits)
1 cup heavy cream

1. Adjust oven rack to middle position and heat oven to 425°F.

2. Place flour, baking powder, sugar and salt in large bowl or work bowl of food processor fitted with steel blade. Whisk together or pulse six times.

3. If making by hand, use two knives, a pastry blender or your fingertips and quickly cut in butter until mixture resembles coarse meal, with a few slightly larger butter lumps. Stir in currants. If using food processor, remove cover and distribute butter evenly over dry ingredients. Cover and pulse 12 times, each pulse lasting 1 second. Add currants and pulse one more time. Transfer dough to large bowl.

4. Stir in heavy cream with a rubber spatula or fork until dough begins to form, about 30 seconds.

5. Transfer dough and all dry, floury bits to countertop and knead dough by hand just until it comes together into a rough, sticky ball, 5 to 10 seconds. Form scones by either a) pressing the dough into an 8-inch cake pan, then turning the dough out onto a lightly floured work surface, cutting the dough into 8 wedges with either a knife or bench scraper  or b) patting the dough onto a lightly floured work surface into a 3/4-inch thick circle, cutting pieces with a biscuit cutter, and pressing remaining scraps back into another piece (what I did) and cutting until dough has been used up. (Be warned if you use this latter method, the scones that are made from the remaining scraps will be much lumpier and less pretty, but taste fine. As in, I understand why they suggested the first method.)

6. Place rounds or wedges on ungreased baking sheet and bake until scone tops are light brown, 12 to 15 minutes. Cool on wire rack for at least 10 minutes. Serve warm or at room temperature.

*sometimes I add strawberries and cream cheese


Paleo Almond Scones

2 cups blanched almond flour
⅓ cup arrowroot flour
½ teaspoon sea salt
2 teaspoons baking powder
2 Tablespoons pure maple syrup
½ teaspoon pure almond extract
¼ teaspoon pure vanilla extract
1 large egg
¼ cup melted organic coconut oil
¼ cup raw, slivered almond pieces

Instructions

Preheat oven to 350F. Line a baking sheet with a Silpat or parchment paper. Combine almond flour, arrowroot flour, salt and baking powder in a large mixing bowl. If there are any lumps in the almond flour, use a fork to break them up.

In the bowl of a stand mixer or another large mixing bowl, combine maple syrup, almond and vanilla extract with the egg.

Turn on mixer and slowly pour in melted coconut oil until well combined. (If using a hand mixer, begin beating mixture and slowly pour in melted coconut oil.)

Pour the liquid mixture into the flour and mix until well combined.

Finally, stir in the slivered almond pieces until mixed throughout. Use your hands to form the dough into a ball. Place on baking sheet and gently press down to flatten.

Cut into eight triangles and bake for 20 to 25 minutes (I had to bake until 25 minutes to get nice brown edges) or until edges are nice and brown but not burnt. Remove and cool completely on a wire cooling rack.


Beef Stew with Guinness

St. Patrick’s Day is around the corner. So I thought that in honor of the Irish… I’d share some recipes that are Irish-y in nature. lol The beef stew below can be made with any food beer, but why not go for the Guinness? The more flavorful the beer, the deeper the underlying notes to the stew. I also do not add potato cubes to the stew either. I prefer to mash the potatoes and then ladle the stew on top of a mound of fluffy white goodness.

Irish Beef and Guinness Stew

2 pounds beef chuck or sirloin, cut into 1-inch chunks (lamb is okay, too)
1/4 cup vegetable oil
2 tablespoons flour
1/2 teaspoon salt
1/4 teaspoon black pepper
1/4 teaspoon cayenne pepper
1/4 teaspoon paprika- I use smoked
1 bay leaf
1 1/2 teaspoons Dijon mustard
1 tablespoon Worcestershire sauce
2 cloves garlic, chopped
2 large onions, chopped
2 tablespoons tomato paste
2 1/2 cups Guinness stout (any dark beer is okay)
1 cup beef stock
4 large carrots, chopped
4 celery ribs, chopped
1 sprig fresh thyme
fresh parsley for garnish


Place beef cubes in a bowl and massage on 1 tablespoon of the oil. In another bowl, stir together the flour, salt, black pepper, cayenne pepper and paprika. Dredge beef in this flour mixture until every side of all the beef pieces are coated and there is no loose flour in the bowl.

Heat remaining oil in a large heavy pot or Dutch oven over medium-high heat. Cook the beef in a single layer. If, due to the size of your pot, you need to do this in batches, take the time. The beef will steam instead of brown if you pile it all on top of itself. Browning it properly is the key to a good stew. After all the beef is browned, make sure it is all in the pot (if you did it in batches) and add the garlic and onions. Stir in for a minute or two (without letting the garlic brown). Add tomato paste, beer and beef broth and thyme. Add carrots, bay leaf, mustard and Worcestershire. Cover and cook for 3 1/2-4 hours at 325 degrees F until beef is tender. During second half of cooking check liquid level a couple times and add a little more beer or broth if too much has evaporated. If you like, you can make mashed potatoes ahead of time, place in a buttered casserole dish, cover with foil and keep warm in the oven with the stew during the last 20 minutes of it’s cooking.

Right before serving, remove the bay leaf, taste the gravy and add more salt and pepper, if needed.

Place a generous dollop of mashed potatoes or champ in a bowl, ladle stew over and sprinkle with parsley.


Crock-Pot method:

Brown beef as described above, then deglaze pan with beer and broth. Add all ingredients to your crock pot. Cook on low for 8-10 hours. Towards end of cooking check liquid level. Add more if needed.


Happy Valentine’s Day 2014

It’s the day of love– for love and lovers.

To that end, I found a compilation of 80s love songs. Yeah, I know it probably dates me… but no one did or does love songs like those songster of yesteryear. So listen to the music as you finish out the post and let the notes carry you to a far, far better place. 😉 Journey, Foreigner and more.

Enjoy!

Nothing says Valentine’s Day like candy and flowers. Bet you didn’t know you could combine those two things. I’ve put a recipe for candied roses down below. But don’t limit yourself to roses. There are lots of edible flowers and a veritable rainbow can be had depending on which bloom you choose.

Sugared Rose Petals and Rose Sugar

Roses first came to the West from Persia in 1240 by way of French Crusaders. The first known cultivated rose is Rosa gallica var. officinalis, also known as the apothecary rose. I use the petals for various things: potpourri, bath fizzies, bath salts, rose water, and cooking. The petals are lovely in salads, but what I really like to do is candy them and make rose sugar.

Sugared Rose Petal Ingredients and Supplies

-pasteurized egg white beaten with a little water (if you’re concerned about using raw eggs, -you can use simple syrup or prepared meringue powder)
-Granulated sugar
-Fragrant rose petals, well rinsed and patted dry
-A small watercolor brush

Rose Sugar Ingredients and Supplies

-Fragrant organic rose petals, well rinsed and patted dry
-Sugar
-A clean, pretty jar, such as a Ball Kilner rubber-sealed jar


To Make Sugared Rose Petals

1. Make sure your rose petals are organic (pesticide free). Remove the bottom white tip of each rose petal and discard; the tips have a bitter flavor. Assemble your supplies.
2. Paint both sides of each rose petal with the egg wash, simple syrup, or prepared meringue powder.
3. Sprinkle the prepared petals in sugar on both sides
4. Set on a piece of parchment paper or wax paper and let dry overnight. If you use simple syrup, the petals won’t hold their shape as well as they do with the egg wash
5. Use your candied petals as edible decorations for cakes, puddings, candies, cookies, and pastries. If you don’t plan to use them right away, store sugared petals in a freezer.


To Make Rose Sugar

1. Make sure your rose petals are organic (pesticide free). Remove the bottom white tip of each rose petal and discard. Sprinkle sugar on the bottom of the jar and sprinkle a layer of rose petals over it. Layer more sugar and rose petals until the jar is filled. Store in a cool, dark place (such as your pantry or cupboard or “close roome”) for several weeks. When you open up the jar you’ll be met with a rosy perfume. You can remove the petals before using.
2. Use your Rose Sugar to flavor pastries, cookies, and confections or sprinkled over their tops. Stir the rose-infused sugar into tea, lemonade, or anything you’d like to give a slight rosy flavor. It’s particularly nice sprinkled on top of scones and shortbread.

***

As you listen to love songs and eat delicious things, remember… today is about love. And love is about giving to others. So don’t forget to spread and share the love. Not just today, but everyday.

Chinese New Year 2014

The Chinese New Year is on January 31st this year. It’s the year of the Horse. Chinese astrology is kinda fun to look up and read about. It is vastly older than most Western astrological systems.

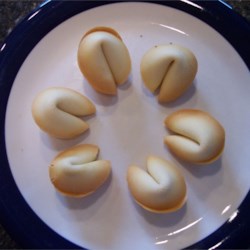
In honor of the Chinese New Year (yes, other Asian countries also celebrate this New Year even though it’s called the Chinese one. lol), I thought I’d share a fortune cookie recipe. Red is the lucky color so make the little fortunes inside red ink on white paper or red paper with a dark or metallic ink.

Enjoy!

Fortune Cookie

3 egg whites
3/4 cup white sugar
1/2 cup butter, melted and cooled
1/4 teaspoon vanilla extract
1/4 teaspoon almond extract
1 cup all-purpose flour
2 tablespoons water

Directions

  1. Preheat the oven to 375 degrees F (190 degrees C). Grease cookie sheets, or line with parchment paper. Have fortunes ready to go on small strips of paper.
  2. In a large glass or metal bowl, whip egg whites and sugar on high speed of an electric mixer until frothy, about 2 minutes. Reduce speed to low, and stir in melted butter, vanilla, almond extract, water and flour one at a time, mixing well after each. Consistency should resemble pancake batter. Spoon the batter into 3 inch circles on the prepared baking sheets. Leave room between for spreading.
  3. Bake for 5 to 7 minutes in the preheated oven, or until the edges begin to brown slightly. Quickly remove one at a time, place a message in the center, and fold in half. Fold the ends of the half together into a horse shoe shape. If they spring open, place them in a muffin tin to cool until set.

* try lemon extract instead of vanilla or a different taste.
** don’t overbake the cookies or they won’t be flexible enough to mold.
*** they are also good dipped in chocolate.

Happy Thanksgiving 2013

Happy Turkey day y’all. Gobble, gobble. lol I actually like Thanksgiving as far as holidays go. I like that it’s about food and family and getting together. In my family, at dinner, we go around the table and tell about the one thing we are the most grateful for that occurred in the last year. Not all the things that make us give thanks or a few of them. Just one. It makes us focus and keeps the momentum going so everyone gets a chance before the dinner is over. It’s awesome.

So many of our holidays have turned into three ring circuses. I like hanging out with friends and family, watching football and generally just being with the people who love us and we love back. Then if you’re lucky, you made plans to go gorilla shopping the next morning, complete with infiltration plans and an exit strategy, with those very same people. Cause for Black Friday shopping, you NEED a posse. People who will have your back and not leave a man behind. But they also have to have sharp eyes to look for bargains as well as coordinate color combinations. So really, you want a variety of family members to go with you to cover your back. Yes, it has gotten that grime out there. Little blue haired old ladies will cut a bitch to get to the blouse on sale. Seriously.

I also vary my menu a little every year. Yes, I do turkey and ham. And most of the sides are perennial favorites. But this year instead of a chocolate pecan pie, we are having a dark chocolate mousse. I’ve decided to forgo candied yams in favor of the simpler baked sweet potatoes. And so on. Here’s my Thanksgiving menu:

brined, dry rubbed turkey
ham
mashed potatoes with roasted garlic and herbs
sweet potatoes
green bean casserole
broccoli and cauliflower in a cheddar cheese sauce
stuffing with chestnuts, gruyere and bacon bits
turkey gravy
pumpkin pie
chocolate mousse
cranberry sauce

This menu is for 4 people. I add more sides and maybe an appetizer sampler if I have guests arriving. But for the small, nuclear family thing? The above menu has been honed from years of tweaking to find the perfect balance for my family. Yours may vary.

Now the best part of Thanksgiving isn’t the main menu, although that is pretty great. Nope, the best part is the left-overs. I like messing around with different recipes to use the turkey as much as possible. I even use the turkey carcass as a soup base. But that’ll come later. And if you serve turkey for Christmas, then some of the leftover recipes will stand you in good stead.