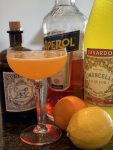
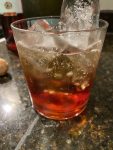
Spruce Tip Vinegar

Evergreen trees have two “flowers” which are useful and edible- the cones and the tips. Pine nuts come from pine cones and they are laborious to acquire. The tips of evergreens, like spruce, however, are far more readily foraged. Using evergreens might seem odd, but think of these as rosemary’s much stronger cousin. Most things you would use rosemary in, spruce tips can be substituted.

When picking these tips, choose the bright green portions only. Some will still be covered in paper as they emerge. There should be a clear distinction between old growth and new growth.

Ingredients:

2 cups red wine vinegar (unfiltered apple cider vinegar can be used for up to half the recipe as well)
1 cup spruce tips, roughly chopped
1 tsp black peppercorns

Directions:

Put all ingredients into a large glass or ceramic container and stir. Cover with cheesecloth and secure with twine. Find a dark, dry place and leave it for 2 weeks. Every few days, take the cover off and stir. Replace the cover and wait. Taste the vinegar at the end of the two weeks. If it isn’t the strength you want, leave it for two more days. Taste it again. Keep tasting every two days.

Side note: Roughly chopped spruce tips can be added to salt to make a spruce salt. Which is delicious on roasted potatoes and french fries.

The vinegar can be used to make a lovely vinaigrette. And for marinades. Which can lead to a lovely dinner. A lovely, romantic dinner. Pro-tip: No matter HOW much love is in the air because of all the killer food, don’t drink the vinegar straight.

Dandelion Jelly

Every girl should have a jelly recipe. One that is her signature jelly. My mom loved strawberry. I’ve always been drawn to the more exotic. Or maybe I was just a rebel. Growing up, I insisted on grape jelly. Bucking the trend and my mom to pick an interloper. I like jelly on savory applications, like breakfast biscuits with sausage. That sweet and salt combine to make more that the two ingredients alone. Over the years, I’ve tried blackberry, blueberry, raspberry, peach and combinations of those flavors. I’ve made strawberry lemon marmalade and I’ve tried even more almost jams, like guava curd.

If your an Alaskan girl, you might have at some time tried dandelion jelly. And if you are of Korean heritage, you might’ve already eaten dandelion leave kimchi. So, you’ve grown up knowing dandelions are more than the weeds lawn care companies tout them to be. They can be a source for some interesting tastes and delicious flavors.

When you are harvesting either the flower buds or the leaves, be sure to pick from areas not sprayed with any pesticides or herbicides. Wash everything thoroughly and spin it in a salad spinner to get the water all the way off. For the flower buds make sure to remove all the green. Including any in the jelly recipe may yield a bitter flavor that is not pleasant. As for the leaves make sure not to include any of the stalk or milky liquid the salt exudes.

Dandelion Jelly

Ingredients:
1 quart dandelion flower buds
5 1/2 cups vanilla sugar- or split one bean into 5 1/2 cups regular sugar
1 lemon- tested and juiced
1 box of pectin
2 quarts water
1 coffee filter

1. Boil flower in the water for 10 minutes. Strains the liquid squeezing the flowers to extract all the juice. Strain again through the coffee filter to remove any sediment. Measure out 3 cups of liquid.

2. Bring dandelion water, pectin, lemon zest and juice to a boil. Add in sugar. Hard boil for 1-2 minutes or until the liquid sheets on the back of a spoon. Skim any crud off the top and pour into jelly jars. Makes about 9 half pints or 5 pints.

*hint: You can add yellow food coloring if the light color isn’t yellow enough for you.

This jelly is lightly floral and sweet. I think it would be perfect as the base for a fruit tart glaze and as the base for a BBQ sauce for fish. It’s also good toast with tea. And if there is romance in the air… tea for two.

Hibiscus Butter

Hibiscus Butter might seem like something inedible, but I assure you it’s delicious.

I first encountered hibiscus as an edible flower back when I was exploring cocktail recipes in Death & Co.s fabulous recipe book. The advent of craft beers has inevitably lead to craft cocktails. And because I’m older, wiser and less able to recuperate I’ve turned to making one or two great drinks as opposed to indiscriminately imbibing anything willy-nilly.

However, this post is not about how to make delicious syrup from whole dried flowers. This post is about how to make yummy butter. Here’s the deal, you can use hibiscus tea from the supermarket. But your butter will turn purple as the tea infuses into the butter. If you order your flowers or get them in a supermarket with the proper ethnic makeup to carry such in stock, your butter will be a light pink. I believe it is the additional ingredients most manufacturers put into hibiscus tea, but I could be wrong. Maybe they have access to super top secret hibiscus flowers which turn purple upon infusion. Because with both the tea and the dried flowers that is what you will do.

You bring your butter- a full pound- up to a slow simmer until completely melted. Take it off the heat. Put either 20 bags (about 1/4-1/3 cup loose leaf tea) of hibiscus flower or 4-6 dried flower into the butter. Let it cool a bit. Test after 15 minutes or so. If the flavor isn’t strong enough, let it steep another 5 minutes. Keep checking every 5 minutes until the butter reaches your desired flavor.

As a side note, if you’ve never tasted hibiscus, it is sweet and tart. When you taste test your butter, if you add a sprinkle or two of sugar granules to offset the tartness, you’ll get a better idea of how your butter will fare in various recipes.

If you wish a smooth butter, strain through a cheesecloth while the butter is still runny and viscous. Make sure you squeeze out each last drop. If you want little flecks of flower in your butter- only recommended for the actual flowers, not the tea- make sure to pulse the dried flowers BEFORE including it to steep in the butter. At this point, you can use this butter as is in any recipe which calls for melted butter. Or you may place this into a container in the refrigerator and let it solidify to use as a butter cream base.

A fabulous way to use this butter is in shortbread and other delicate dessert recipes. And who knows, maybe you’ll be inspired enough to make this into sugar and also full flower syrups. They are a beautiful addition to any table.

Lilac Whipped Cream

Yes, yes you CAN make whipped cream from lilac flowers. And it is the BOMB!The ingredients aren’t many, but the results? FAB-U-LOUS!

If you have the time, make some Lilac sugar using the same technique for rose sugar.

Take 2 cups of whipping cream and infuse 2 cups of lilac flowers. If you are using fresh, make sure they are dry and all the green has been removed. Throw them into the cream and let steep for at least 24 hours. Start tasting every 4-6 hours thereafter to see how strong the flavor is. Once it’s where you want, strain the cream through a strainer to remove any flowers. And use as you would any regular whipping cream, although I’d only use it with things that will be delicious with lilac. Like cakes and pies. If you want the added sweetness, add 1/4 cup of sugar about halfway through the whipping process. So, steep the flowers, strain, and then whip. Easy-peasy.

As you are making this whipping cream , it is very important the you taste all along the way. This cream would also make an excellent base for ice cream.

No matter who you are, air redolent with lilac… heavy with promise is all the things that ROMANCE and spring time is all about. Use the whipping cream with a HEAVY does of imagination!

Nasturtium Capers

Yesterday was Valentine’s Day. A day for lovers of all kinds. If you’ve done it right, your waistline is a little bit wider and your wallet is a little bit lighter. Part of the day after should be something light, something great and something that helps cut through all the richness from the day of indulgence that Valentine’s Day represents.

Nasturtiums are the answer. Many of you probably already know that the flowers are edible. They have a sharp, peppery taste which adds a little bit of goodness to any dish. Not only do they make salads beautiful and colorful, they add a peppery layer that black peppercorns just can’t add. But did you know that you can whip those flowers up into a butter? Nasturtium butter adds a floral, pepper flavor to toast, scones and anything else slathered with this rainbow-y goodness.

But the real gems are the seeds. I’m not sure if you’re a caper lover like me, but nasturtium seeds can be turned into awesome almost capers. These have been dubbed poor man’s capers. The great thing is that nasturtiums grow abundantly. And if you’ve seeded them in the proper place, you will have flowers coming back year after year. Which means you will have nasturtium capers every year as well.

Ingredients:

2/3 cup nasturtium seed pods, cleaned
1/4 cup salt
2 cups water
2/3 cup distilled white vinegar (5% acidity at least)
1 tsp- 2 tbsp sugar

optional ingredients (pick 2 at least):
bay leaf
coriander seeds
tarragon or other fresh herbs
jalapeno
red pepper flakes
juniper berries
pickling herbs

Directions:

Divide nasturtium seeds into half pint jars. Add optional ingredients to the half pint jars. They can be different. In fact, you should try out different flavor combinations to see which you like best. Dissolve salt and sugar in the water. Add vinegar and bring to a slight simmer. Pour over seeds, seal and store. There’s a lot of mustard oil in the seeds. So they might be too strong for some people at this point. If you find that they are too much for you, an extra processing step might be needed.

If you find the seeds to be too strong even with a good vinegar brine, seperately salt brine them first. Use the salt and water to create a salt brine and soak seeds for 2-3 days in one large quart jar. Drain and rinse seeds several times and divide into pint jars. Then make the sugar/vinegar brine and pour over seeds in half pint jars- don’t add more salt at this juncture or the seeds could become too salty. At this point, add in the optional ingredients and the sugar/vinegar brine. Process either by refrigerating or hot water bath.

These will keep forever. Well, not literally forever. But a really long time. So the next time, you’ve eaten too much or partied too hard, the next day use the vinegar-y goodness of nasturtium seeds to cut through all that bulls..shtuff.

Lavender Ice Cream

You might have figured out by now–although this is only my second post–that flowers play an important part of what I think of when I think of romance. The way they look. They way they smell. And yes, even the way they taste.

It might be odd to find a recipe featuring ice cream in November. But if you think about how heavy many of our menus are during this month, it isn’t that surprising that something that’s light and refreshing might hit the spot. When holiday meals become too much, grab your special someone and share lavender ice cream… right out of the tub.

It’s really rich, so like the best of things, small amounts go a long way. And a shared delight is just that much better.

Lavender Ice Cream

6 egg yolks
2 cups half and half 1 cup cream
2/3 cup vanilla sugar
1 vanilla bean
3 whole lavender tops or 2 tbsp dried lavender- be sure to use organic, food grade

1. Prepare a water bath in a large bowl. Set aside.

2. In a saucepan, heat half & half with the cream and the vanilla bean pod denuded of its interior until it simmers. Take off heat and add in the lavender to steep. Set aside until almost room temperature, about 45-60 minutes. When the time has lapsed, strain the mixture and bring it back up to temperature- just short of simmering again. Take off the heat. *Pro-tip: Frozen foods need more flavor for it to come through the freeze. So taste the cream mixture. It should taste fairly strong. Don’t be alarmed. Once the ice cream is fully frozen, the flavor will have mellowed out. In fact, with any flavoring that you add to ice cream or any frozen dessert, it’s best if the flavor is pretty strong prior to freezing to get the best flavor.*

3. Mix egg yolks until lighter in another bowl. Add in vanilla sugar and the scraped out insides of the vanilla bean. Mix well. Temper the eggs with some of the cream mixture until the eggs are brought up to the same temperature as the cream mixture. *tempering of the eggs is why you brought the cream back up to temperature in the last step* Pour it all into the saucepan. Heat over medium-lowish heat for about 2-3 minutes or until it coats the back of a spoon or it reaches 170 degrees.

4. Pour the mixture back through a fine mesh strainer into the egg/sugar bowl and put it all into the water bath. Bring the custard down to room temperature as quickly as possible. About 30-45 minutes. Put it into the fridge uncovered until it no longer forms condensation. Then cover and let sit in fridge for 4-6 hours or overnight.

5. Put into ice cream maker and follow the instructions for the machine.

This ice cream is particularly delightful with sugar cookies made with rose sugar or orange sugar.

Enjoy!

~D

Rose Sugar

Romance and Roses go hand in hand. To make some fabulous rose sugar, it takes almost zero time and only a little advanced planning.

Glass container, sealable to be airtight
White sugar
Rose petals, organic and pesticide free

I didn’t include any measurements because the volume of sugar will vary depending on the size of the container used. Add some sugar, layer in some petals, add more sugar, and repeat until filled.

Keep the sugar closed for at least two weeks. This gives the oils in the roses time to infuse all the sugar.

This sugar can be used in baking delicate treats, like scones. It can also be used to make simple syrup. And simple syrup can be used in a variety of ways, limited only by your imagination.

Alcohol is the New Lube

Seriously. Don’t we already know this? And I mean lube in the best sense of the word. A drink, a cocktail, a beer… all make things easier to deal with. Maybe not deal with in a better way, but deal with as in not allowing the small stuff slow down your flow.

Bad day at the office? A glass of wine makes it all better. Bad day at the office? A glass of wine makes it all better. Argument with the spouse? A mojito might just hit the spot. A promotion at work? Cocktails, all around.

Now, don’t be thinking I think one should use alcohol as a crutch. You shouldn’t. If you need booze to actually deal with the things in your life, alcohol is using you and not the other way around. But at the cap or topper, occasionally? Shoo, we all do it. Now, don’t be thinking I think one should use alcohol as a crutch. You shouldn’t. If you need booze to actually deal with the things in your life, alcohol is using you and not the other way around. But at the cap or topper, occasionally? Shoo, we all do it.

With Halloween just around the corner. You know you’re gonna need a drink to handle all the rugrats about to bumrush your door, yo. And why not show up with a fabulous drink in your hands? 😉

Black Devil Martini

2 oz black rum
1/2 oz dry vermouth (I like Dolin Dry)
black olive garnish
orange sugar

1. Wet rim of martini glass with either rum or vermouth. Coat with orange sugar.
2. In a shaker, combine rum and vermouth with ice. Shake vigorously. Pour into glass. Garnish with black olives.
3. Be devilish. 😉

If you can keep your equanimity while handing out candy to strangers who feel that on one night of the week they can come to your door and beg, then maybe, just maybe, the night will end with some much needed romance. Because this drink is strong and it’s a twist on a traditional martini. And martinis are my jam, y’all. So… oh lube of life, I know you won’t fail me. Because if I’m just a little buzzed, I’m a happy girl and love is in my future. It’s amazing how a drink can somewhat predict my future. And that of my fabulous man. If you can keep your equanimity while handing out candy to strangers who feel that on one night of the week they can come to your door and beg, then maybe, just maybe, the night will end with some much needed romance. Because this drink is strong and it’s a twist on a traditional martini. And martinis are my jam, y’all. So… oh lube of life, I know you won’t fail me. Because if I’m just a little buzzed, I’m a happy girl and love is in my future. It’s amazing how a drink can somewhat predict my future. And that of my fabulous man.

In any event, mix up a martini. And you might meet your own devil on Halloween. He might even be wearing blue jeans. In any event, mix up a martini. And you might meet your own devil on Halloween. He might even be wearing blue jeans.

Homemade Ice Cream

I know I’m jumping the gun. I know that Spring isn’t even here yet. I know all of this. Still, I am craving ice cream. Cold and creamy served under delicious hot fudge, whip cream and nuts. Warm weather can’t get here soon enough. Until then, I’m cranking up the heat and eating ice cream pretending that it’s Summer already.

I use a recipe that is a cross between Alton Brown’s recipe and a Chowhound recipe. It’s a basic vanilla custard. It is fabulous on its own, or you can be adventurous and add other goodies as it mixes.

Homemade Ice Cream

6 egg yolks
2 cups half and half
1 cup cream
2/3 cup vanilla sugar
2 tsp vanilla extract
1 vanilla bean

1. Prepare a water bath in a large bowl. Set aside.

2. In a saucepan, heat half & half with the cream and the vanilla bean pod denuded of its interior until it simmers. Take off heat and set aside.

3. Mix egg yolks until lighter in another bowl. Add in vanilla sugar and the scraped out insides of the vanilla bean. Mix well. Temper the eggs with some of the cream mixture until the eggs are brought up to the same temperature as the cream mixture. Pour it all into the saucepan. Heat over medium-lowish heat for about 2-3 minutes or until it coats the back of a spoon or it reaches 170 degrees.

4. Pour the mixture back through a fine mesh strainer into the egg/sugar bowl and put it all into the water bath. Bring the custard down to room temperature. About 30-45 minutes. Put it into the fridge uncovered until it no longer forms condensation. Then cover and let sit in fridge for 4-6 hours or overnight.

5. Put into ice cream maker and follows the instructions for the machine.

Enjoy!

Foggy Bottom Split Pea Soup

As Fall turns into Winter, all official like, on the solstice, many people around the world celebrate this turn of the season. I always think of it as one last hurrah before we hunker down for the colder months to come. One last feast of plenty in preparation of leaner times. Well, at least that’s how I think it used to be.

In the US, our Holiday Season begins with Thanksgiving and extends straight through to New Year’s Day. In a country of plenty, we’ve taken plenty to the nth degree straight into a month and a half of plenty. I want to muster some form of disgust at this blatant display of wealth and abundance but I can’t. I really can’t. Because the food is frickin’ delicious. Some part of me is just not able to flame the small amount of guilt at loving the food so much into a conflagration. I’m too distracted by the yummy. I like celebrating with food and friends and family and fellowship with all of the above. I like the convivial communal table that comes with such yummy goodness.

To assuage some of the feelings that not feeling bad makes me feel, I pay homage to principles of conservation. What the hell do I mean, you ask. Well, it really is all about the ham bone. Left-overs, yo. What the hell to do with the ham bone. Cause I know you saved it instead of being wasteful. If you thought ahead, you left lots of meat on the bone. Were going to use it to make split pea soup. So break out the Beano, or just go find a room in which to be alone.

Repurpose the Bone! 😉

Foggy Bottom Split Pea Soup


Ingredients:

1 medium onion, diced
1 clove garlic, minced
2 medium carrots, half-mooned
3 stalks celery, diced
1 Tbsp Herbes de Provence
Ham Bone- leave the meat on as it cooks
8 cups chicken/turkey stock (I make stock from the bones of the Thanksgiving turkey)
1 small bag green or yellow split peas
parsley
salt
pepper
optional: 3 medium diced red or yellow potatoes

Directions:

1. Over medium heat, cook onions until translucent. Add garlic, cook for a minute. *I like garlic in my split pea soup. Some people don’t. Omit if you want.* Add carrots and celery. *If you’re adding potatoes, do it here as well.* Cook for 3-5 minutes. Season with salt and pepper. Add the Herbes de Provence. Cook for 2 minutes more.

2. Place Ham bone in the center of the pot. Sprinkle the peas around the bone. Cover with broth- use more or less depending on how big your pot is. Also, any stock not used can be added in later. Bring to a boil. Reduce to simmer and cover. Cook for 40-45 minutes, or until peas are tender.

3. Remove ham bone and set aside to cool slightly. Mash some of the peas with a big spoon, or blend half of it, or use a hand mixer and pulse a few times. Leave enough peas and veggies intact to not have the whole thing mushed. When bone is cool, remove meat. Either tear or chop ham and put back into the pot. Correct seasoning and liquid level. Serve with fresh parsley on top.